What You’ll Build
A deployment workflow that:- Validates cluster health
- Creates or updates a deployment
- Configures autoscaling
- Sets deployment status as output
Prerequisites
- Access to Bud AI Foundry
- At least one registered cluster
- A model ready for deployment
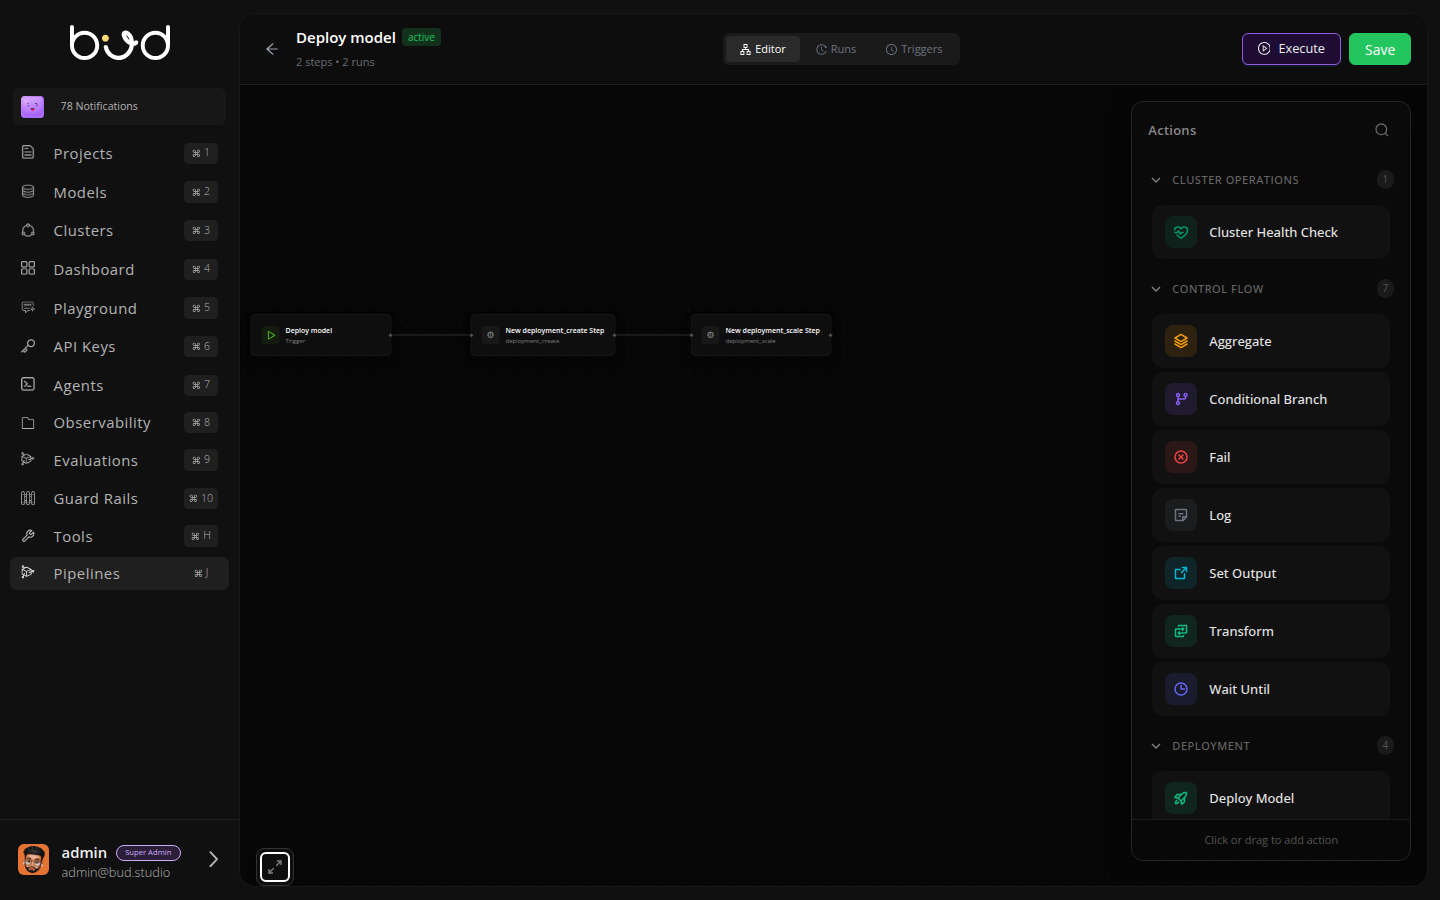
Step 1: Create the Pipeline
- Navigate to Pipelines in the sidebar
- Click + Pipeline
- Configure:
- Name: “Deploy Model”
- Description: “Automated model deployment with health check”
- Click Create
Step 2: Add Cluster Health Check
Let’s start by verifying the cluster is ready:- From Actions panel → Cluster Operations
- Drag Cluster Health Check onto canvas
- This becomes your trigger node
- Configure:
- Cluster ID:
params.cluster_id - Timeout: 30 seconds
- Cluster ID:
- Click Save
Step 3: Add Deployment Creation
Now add the deployment step:- Drag a Transform action onto the canvas
- Connect Cluster Health Check → Transform
- Rename to “Create Deployment”
- Configure:
- Operation:
deployment_create - Model ID:
params.model_id - Deployment Name:
params.deployment_name - Cluster:
params.cluster_id
- Operation:
- Click Save
Step 4: Configure Autoscaling
Add autoscaling configuration:- Drag another Transform action
- Connect Create Deployment → this new Transform
- Rename to “Configure Autoscale”
- Configure:
- Operation:
deployment_autoscale - Deployment ID:
steps.create_deployment.output.deployment_id - Min Replicas:
params.min_replicas - Max Replicas:
params.max_replicas
- Operation:
- Click Save
Step 5: Add Conditional Success Check
Let’s verify the deployment succeeded:- Drag Conditional Branch after autoscale
- Configure condition:
- Click Save
Step 6: Set Pipeline Outputs
For the success path:- Drag Set Output connected to Conditional Branch (true)
- Configure:
- Key: “deployment_status”
- Value: “success”
- Key: “deployment_id”
- Value:
steps.create_deployment.output.deployment_id
- Click Save
- Drag Fail action connected to Conditional Branch (false)
- Configure:
- Message: “Deployment failed - autoscaling not active”
- Click Save
Step 7: Add Logging
Add visibility with log actions:- Drag Log after health check
- Configure: “Cluster health verified ✓”
- Repeat after each major step with appropriate messages
Step 8: Save and Test
- Click Save in the top-right
- Click Execute
- Enter test parameters:
- Click Run
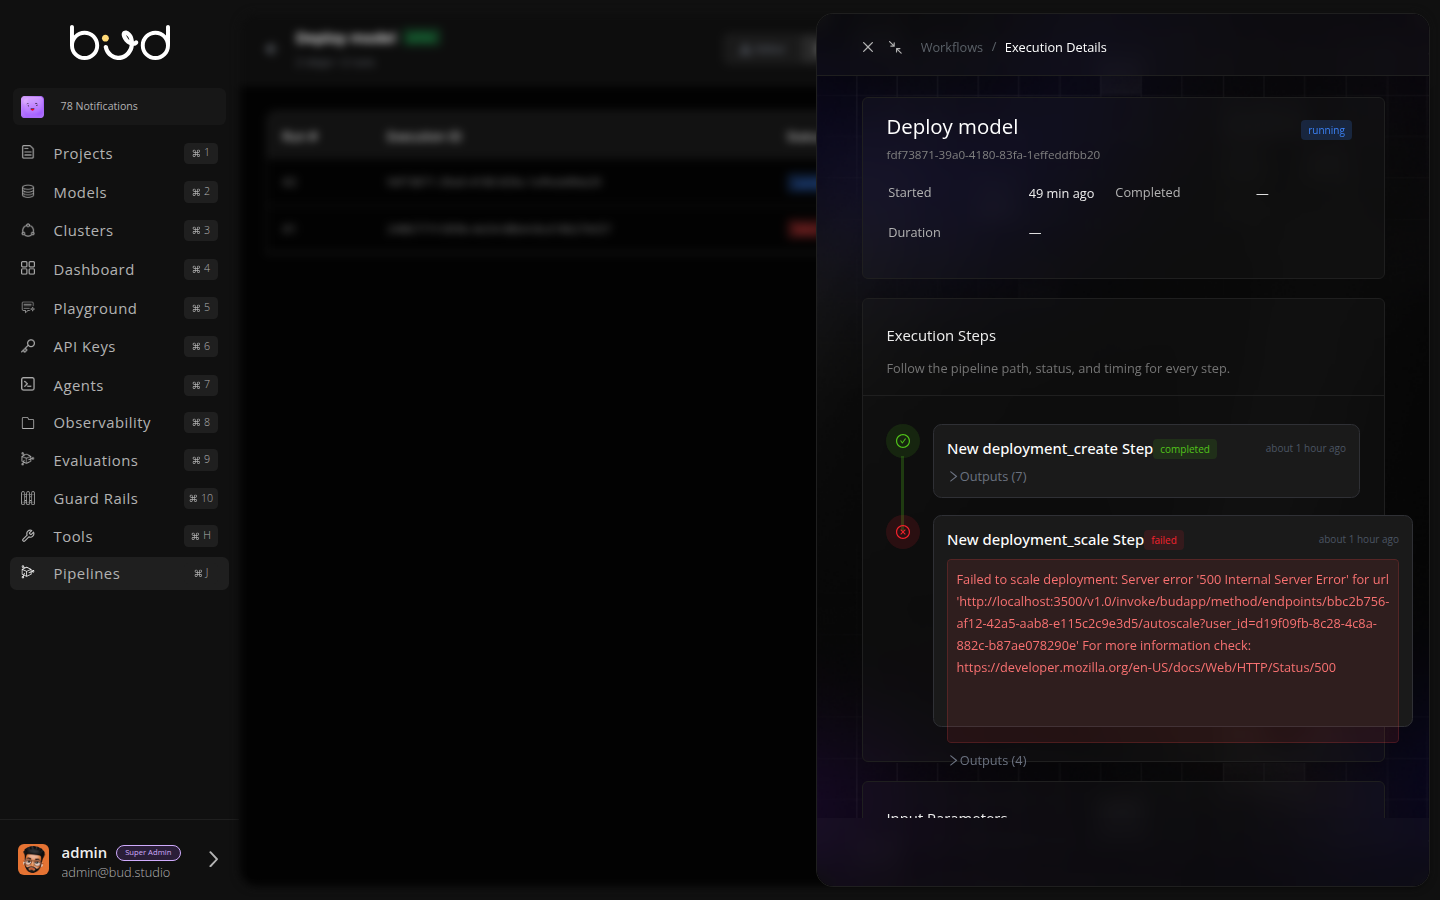
Step 9: Monitor Execution
- Switch to Runs tab
- Watch your pipeline execute in real-time
- Click View to see detailed logs
- Verify the output shows deployment status
Step 10: Set Up Triggers (Optional)
Automate execution:Manual Trigger
Already configured - use Execute buttonScheduled Trigger
- Go to Triggers tab
- Click Add Schedule
- Enter cron:
0 2 * * *(daily at 2 AM) - Click Save
Event Trigger
- Click Add Event Trigger
- Select event:
model.updated - Add filter:
model_id == params.model_id - Click Save
Best Practices Applied
Health Check First: Always verify infrastructure before deployment
Parameterized: Reusable across different models and clusters
Error Handling: Conditional branching with explicit failure
Observability: Log actions at key points
Clear Outputs: Structured outputs for downstream systems
Troubleshooting
Health check fails
Health check fails
Cause: Cluster not ready or ID incorrectSolution: Verify cluster status in Clusters page, check cluster_id parameter
Deployment creation fails
Deployment creation fails
Cause: Invalid model ID or insufficient cluster resourcesSolution: Verify model exists, check cluster capacity
Autoscaling not active
Autoscaling not active
Cause: Deployment didn’t start successfullySolution: Check deployment logs, verify resource requests
Next Steps
Pipeline Concepts
Understand DAGs and actions
Quick Start
Build your first pipeline in 5 minutes
Troubleshooting
Common issues and solutions